How to Restore a Historic Staircase Without Losing Its Character
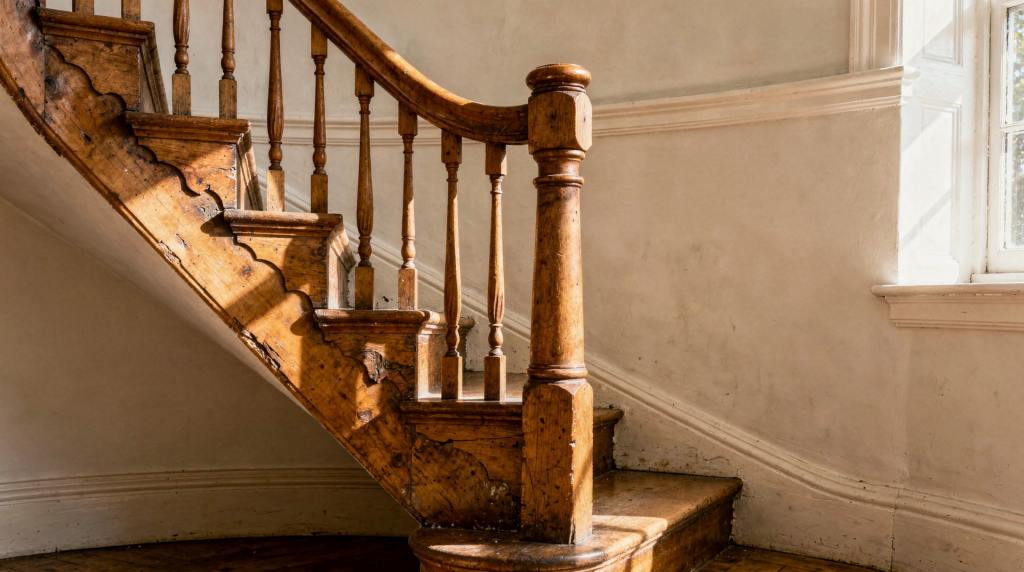
A historic staircase does far more than move people between floors. It often carries the visual weight of the whole interior, with original timber, hand-shaped details, and proportions that tell you how the house was built. The key to a good restoration is simple: keep as much original fabric as possible, repair before replacing, and make every intervention reversible where you can.
Why historic staircases deserve a different approach
A staircase in a period house is usually a fitted piece of joinery, not a standard building component. Treads, risers, handrails, balusters, newel posts, and stringers were often made to suit one specific building, which is why careless replacement can flatten the character of the whole interior. I’ve walked into Georgian townhouses where someone had ripped out the original stair and installed a standard off-the-shelf flight — the proportions were wrong, the handrail sat too high, and the whole entrance hall lost its sense of purpose. Once it’s gone, you can’t get that back.
That matters for three reasons:
- Original staircases carry craftsmanship that cannot be recreated cheaply or convincingly. The slight irregularity in a hand-turned baluster, the wear pattern on a tread that tells you which side people favoured — these are not flaws, they’re evidence.
- Historic stairs often have design details that define the property’s period and status. A closed-string stair with carved brackets says something quite different from an open-string stair with slender turned balusters, and that language matters when you’re reading a house.
- Once original parts are removed, the loss is usually permanent, even if replacements are “matching.” Matching is a loose term in this trade — I’ve seen too many “exact copies” that missed the profile by a few millimetres, and the eye registers the difference even if the mind can’t name it.
Start with assessment, not stripping
The biggest mistake is to begin by sanding, painting, or ripping out carpet before you understand what you have. A proper assessment tells you which parts are sound, which are failing, and which details must be protected. I learned this the hard way early in my career, watching a contractor strip a Victorian staircase only to discover that the paint was holding together woodworm-damaged timber that then needed extensive — and expensive — repair.
What to inspect first
- Tread wear, cracking, and movement under load — stand on each tread and feel for deflection; a slight give might be acceptable, but bounce or creaking that shifts underfoot needs investigation
- Loose risers or open joints — gaps between tread and riser often signal movement in the wedges beneath, which is usually fixable
- Splits in balusters, handrails, or newel posts — look for vertical cracks following the grain, especially where fixings have been overtightened over the years
- Signs of woodworm, rot, or previous patch repairs — fresh frass (fine sawdust) means active infestation; dark staining and soft timber suggest rot
- Deflection, bounce, or sag in the stair structure — check from underneath if you can access the soffit; look for separated wedges or cracked stringers
- Hidden damage under carpet, paint, or boxed-in areas — lift a corner of carpet if possible, and probe painted surfaces gently with a thin blade to check for soft spots beneath
A staircase can look tired without being beyond repair. In many cases, the right approach is targeted repair rather than full replacement. I’ve assessed stairs that looked catastrophic — peeling paint, creaking treads, missing balusters — and turned out to need nothing more than regluing, a few splice repairs, and careful refinishing.
Keep the historic fabric whenever possible
Preservation guidance consistently favors retaining original staircases in place or reusing them, and repairs should be the first option in rehabilitation projects. Minimum intervention is the principle that protects both character and budget over the long term. Every piece of original timber you remove is a piece of the building’s story you’re discarding, and once it’s in the skip, no amount of money brings it back.
Good preservation choices
- Re-glue loose joints instead of rebuilding entire sections — old hide glue can be reactivated or replaced, and a well-clamped joint is often stronger than the surrounding wood
- Splice in small areas of damaged tread or riser instead of replacing the whole board — a Dutchman repair, where a precisely fitted patch replaces only the damaged section, preserves most of the original board
- Repair split balusters, handrails, or nosings where the damage is localized — a split baluster can often be glued and clamped back to full strength if the break is clean
- Reinforce unstable elements from beneath where discreet access is possible — metal brackets or timber blocking added under the stair can stiffen the structure without altering its appearance
- Refinish original timber rather than replacing it with new material — even heavily worn timber can often be revived with careful cleaning and an appropriate finish
Poor preservation choices
- Removing the entire staircase because the finish looks worn — this is like replacing a Georgian sash window because the paint is peeling
- Replacing original balusters with generic modern versions — the profile will be wrong, the spacing may not match, and the visual rhythm of the balustrade will be lost
- Using overly aggressive sanding that erases mouldings and edges — I’ve seen handrails reduced to featureless rounded profiles by overzealous belt sanders
- Covering historic features with irreversible layers of new material — once you clad original risers in MDF, you’ve buried the evidence and probably introduced moisture problems
- Changing the stair profile simply because a contractor finds it easier — a steeper historic stair may not meet modern building regulations, but there are often better solutions than rebuilding
Repair methods that usually work well
The right repair depends on the failure point, but historic staircases often respond well to small, skilled interventions. Many original stairs were assembled from separate components, which makes selective repair possible. The wedged construction typical of pre-20th-century stairs — where treads and risers are housed into the stringer and secured with timber wedges from below — is particularly amenable to repair, because individual elements can often be re-tightened or replaced without disturbing the whole assembly.
Common repair scenarios
| Problem | Preferred approach | What to avoid |
|---|---|---|
| Loose treads | Re-fix, shim, or add discreet secondary support from below | Replacing all treads at once — loose treads are rarely all failing for the same reason |
| Split handrail | Glue and clamp if the split is stable; splice if needed | Filling deep splits with bulky filler — it will crack as the timber moves seasonally |
| Damaged tread nosing | Cut back and splice in a shaped repair piece matched to the original profile | Squaring off the original profile — it changes the stair’s visual character and can create a trip hazard |
| Broken baluster | Replace only the damaged baluster, matched in profile by a competent turner | Replacing the whole balustrade — a single baluster can usually be copied from its neighbours |
| Worn risers | Patch or insert a shaped section of matching timber | Covering with thick, modern cladding that alters the riser height or traps moisture |
| Surface wear | Clean and refinish with an appropriate coating | Heavy sanding that removes detail — surface wear is patina, not damage |
Where new timber is introduced, it should be fully seasoned to reduce shrinkage and warping later on. Green or inadequately dried timber will move as it acclimatises, opening joints and undoing careful repair work within a season or two.
How to preserve character while making it safe
Historic stairs have to work in the real world, and safety matters. The challenge is to improve performance without erasing the original form. Guidance on historic interiors recommends retaining stairs in their historic configuration and location whenever possible, while using modern methods to improve safety and compliance where needed. A Georgian stair with a 220mm rise and 200mm going may not meet current Part K requirements, but that doesn’t automatically mean it needs rebuilding — context matters, and so does the fact that occupants have navigated it safely for two centuries.
Practical ways to improve safety discreetly
- Tighten loose handrails and newels to reduce movement — a wobbly handrail is far more dangerous than a steep pitch, because people rely on it for stability
- Improve stair lighting rather than altering the stair geometry — well-placed lighting at tread level can dramatically reduce trip risk without touching the historic fabric
- Add subtle anti-slip measures to treads — clear anti-slip strips or discreet inset panels can improve grip without changing the stair’s appearance
- Reinforce weak sections from below if the structure allows it — additional blocking or metal brackets fitted to the underside are invisible from above
- Use secondary routes for fire-egress requirements instead of rebuilding the historic stair — a protected stair in a modern extension can satisfy building control while leaving the original stair untouched
If a building is listed or otherwise protected, any proposed change should be checked carefully before work starts. In that context, “improvement” is not the same as “replacement.” Conservation officers will generally support sensitive safety upgrades, but they’ll want to see evidence that you’ve explored the least invasive options first.
Finishes: how to clean, refinish, and protect original timber
A staircase finish should protect the wood without making it look plastic or over-restored. The best result is usually a finish that suits the age of the house and the level of wear. I’ve seen too many staircases ruined by thick polyurethane coatings that sit on the surface like a plastic film — they might be durable, but they look wrong in a period interior and they’re difficult to reverse.
Step-by-step finishing approach
- Remove carpet, underlay, tacks, and staples carefully — use a tack lifter and pliers rather than levering against the timber with a screwdriver
- Clean accumulated dirt before deciding on sanding — decades of grime can make timber look darker and more damaged than it really is; a gentle clean with white spirit and fine steel wool often reveals surprisingly sound wood beneath
- Test the existing finish in a discreet area — a cotton bud dipped in denatured alcohol will tell you if it’s shellac; a test patch of stripper on the underside of a tread will show what you’re dealing with
- Sand only as much as needed to smooth damage, not erase detail — start with 120 grit and work up; never use a belt sander on moulded profiles
- Repair dents, chips, and open joints before applying finish — finish won’t hide defects; it highlights them
- Apply a finish compatible with the staircase’s use and historic character — test on an inconspicuous area first and let it cure fully before judging the result
- Let each coat cure properly before heavy traffic returns — rushing this stage is the most common cause of finish failure
Finish selection tips
- Wax can suit lower-traffic original timber in formal spaces — it’s easily maintained and reversible, but it offers limited protection against moisture and abrasion
- Paint works well when the staircase was historically painted or needs a durable, period-appropriate finish — many Victorian and Edwardian stairs were always painted, and stripping them back to bare timber can be historically wrong as well as practically difficult
- Varnish or clear protective coatings should be chosen carefully so they do not look overly modern — a matt or satin finish usually reads better in a period interior than high gloss
- If the staircase will see heavy use, durability matters, but glossy modern surfaces can look out of place in a period interior — consider a hardwax oil as a compromise that offers reasonable protection without the plastic look of polyurethane
When replacement is justified
Sometimes a staircase really is too damaged to save in its current form. Even then, the goal should be to replicate the original design as closely as possible and preserve any salvageable components. I’ve been involved in projects where the stair was so badly attacked by rot that the structural timber crumbled under a probe — there’s no repairing that, and pretending otherwise is dangerous.
Replacement may be justified when:
- Major structural failure makes repair unsafe — if the stringers are split through or the newel posts have lost their bearing, the stair may be beyond saving
- Previous alterations have already destroyed historic integrity — if 1970s renovations replaced half the balustrade with chipboard and softwood, you’re not losing original fabric by starting again
- There is extensive rot or insect damage through critical load-bearing parts — when damage extends deep into structural members, localized repair becomes impractical
- The staircase has been altered so many times that restoration is no longer feasible — a stair that’s been moved, cut down, and patched with three different timber species may have lost its historic coherence
Even in those cases, salvaging the original rails, balusters, newel posts, or decorative trim can preserve a substantial part of the story. I’ve seen salvaged balusters incorporated into a new stair in their original sequence, and the result carried the memory of the old stair even though the structure was new.
Common mistakes that erase character
Historic stair restoration goes wrong when the work focuses only on surface appearance. The most common errors are avoidable, and they almost always stem from impatience or a misunderstanding of what makes a historic stair valuable in the first place.
- Over-sanding the timber until mouldings become soft and lifeless — the crisp arrises on a handrail or the fine detail on a turned baluster are what distinguish handwork from machine production
- Replacing handmade details with standard machine-made components — a turned baluster from a catalogue will never match the slight asymmetry of a hand-turned original
- Using modern bulky trims that overwhelm narrow historic proportions — a chunky modern skirting or stringer capping can visually dominate a delicate Georgian stair
- Painting over fine joinery without first checking whether it was originally stained or varnished — a quick investigation under a stair bracket or behind a stringer moulding often reveals the original finish
- Ignoring the underside of the stair, where key structural clues often survive — the soffit may show original wedges, carpenter’s marks, or evidence of earlier repairs that inform the restoration approach
- Failing to record what was there before the work begins — take photographs, make measured drawings, and keep samples of removed material; you’ll need them if questions arise later
A staircase can look “new” and still be wrong for the house. The aim is not to make it look factory-fresh; it is to make it stable, usable, and believable in its setting.
A practical restoration checklist
Use this as a quick project guide before work begins:
- Photograph every elevation, joint, and decorative detail — digital storage is cheap; lost information is expensive
- Identify which parts are original and which are later replacements — look for differences in timber species, tool marks, and fixing methods
- Check for movement, rot, insect damage, and hidden structural issues — use a moisture meter and a probe; don’t rely on visual inspection alone
- Decide what can be repaired in place — many repairs are simpler and stronger when done in situ rather than dismantling the stair
- Keep all reusable components until the project is complete — that “scrap” baluster might be the pattern for turning replacements
- Match new timber to the old in species, grain, and profile where possible — take a sample to a reputable timber merchant; don’t guess
- Use seasoned timber for any new insertions — specify moisture content below 12% for interior work
- Protect mouldings and edges during cleaning and sanding — mask off areas you’re not working on, and use hand tools rather than power sanders on detailed profiles
- Refinish in a way that suits the building’s period — research what would have been used originally, and test your chosen finish before committing
- Confirm consent or permissions if the staircase is in a protected property — listed building consent may be required even for repairs if they affect character
Working with a conservator or joiner
Not every stair carpenter understands historic fabric. For an important staircase, choose someone who knows the difference between restoration, repair, and reproduction. The best specialists will start with a structural assessment, then recommend the least invasive route that still makes the stair safe and usable. I’ve worked with joiners who could reproduce an 18th-century handrail profile by eye, and I’ve worked with others who thought “close enough” was good enough — the difference shows for decades.
Ask these questions before commissioning work:
- How much of the original staircase can be retained? — the answer should be specific, not a vague “as much as possible”
- Which repairs will be done in situ, and which will require removal? — in-situ work is usually less disruptive and preserves more original context
- How will new timber be matched to existing material? — look for someone who talks about sourcing from specialist mills rather than picking up whatever the builder’s merchant has in stock
- What will be reversible if future conservation is needed? — if they can’t answer this, they probably haven’t thought about it
- How will the work affect historic profiles and finishes? — a good conservator will protect what they’re not working on and document what they are
FAQ
Can you restore a historic staircase without stripping all the paint?
Yes. If the paint is stable and historically appropriate, partial cleaning, localized repair, and selective refinishing may be better than full stripping. Many staircases were always painted, and removing paint can expose timber that was never meant to be seen — full of knots, sapwood, and filler. Stripping also risks damaging the surface beneath, especially if heat guns or aggressive chemical strippers are used.
Is it better to repair or replace old stair treads?
Repair is usually preferred first. Replacement should be limited to sections that are too damaged to stabilize safely. A tread with surface wear and a few cracks can often be repaired with splices and careful refinishing; a tread that’s split through its full thickness or rotted at the housing is a candidate for replacement, but only that tread, not the whole flight.
How do you keep a staircase safe without changing its look?
Tighten structural connections, improve lighting, add discreet anti-slip measures, and reinforce weak areas from below where possible. Most stair accidents happen because of poor lighting or loose handrails, not because of the stair’s geometry. Address those issues first before considering more invasive changes.
Should historic staircases be sanded?
Only carefully and only as much as necessary. Heavy sanding can remove original edges, mouldings, and signs of craftsmanship that define the staircase’s character. If you must sand, use a block on flat surfaces and shaped sanding pads on profiles — never wrap sandpaper around your fingers and go at a moulding freehand.
What if the staircase is beyond repair?
Salvage and restore any reusable parts, then reproduce the stair as faithfully as possible to the original form and proportions. Document everything before dismantling, and keep the salvaged components — they’re the primary evidence for the reproduction, and they may have value in their own right.
Final thoughts
Restoring a historic staircase is a conservation task as much as a joinery job. The best results come from restraint, good diagnosis, and respect for original material. If you keep repairs targeted, match new work carefully, and avoid the temptation to over-modernize, you can make the staircase safe and beautiful without losing the character that made it worth saving in the first place. The stairs that stay with me are not the ones that look brand new — they’re the ones where you can still see the wear of a hundred years of hands on the rail, where the repairs are honest and the timber tells its story.