Historic Masonry and Mortar: Principles for Compatible Repairs
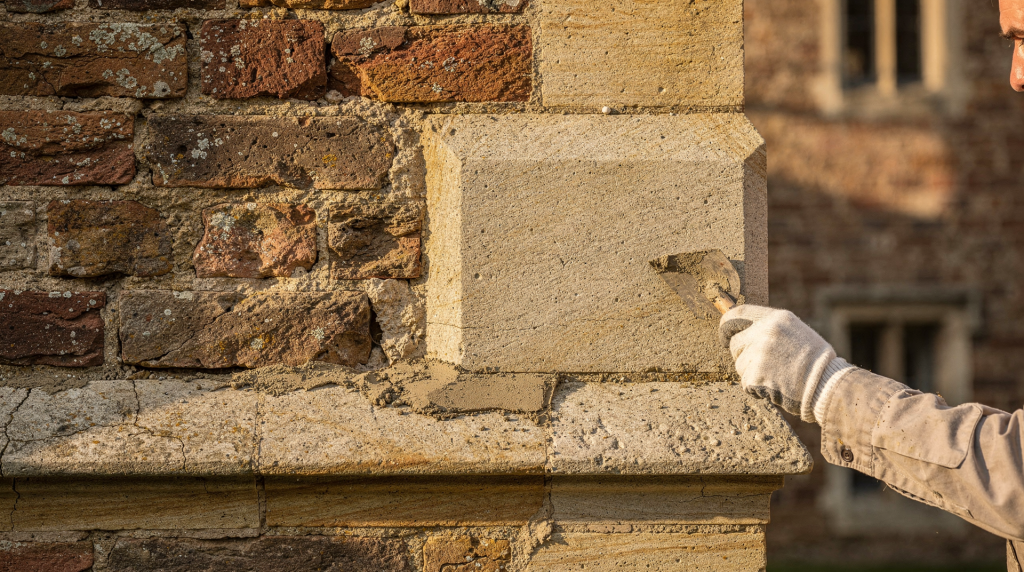
Walk up to any historic wall and put your hand flat against it. The first thing you notice is rarely the stone or brick — it’s the joints. Those lines of mortar tell you more about the building’s health than almost anything else. They show you where water has been moving, where movement has occurred, where someone tried to fix something they didn’t understand. After fifteen years of looking at period properties, I’ve learned that mortar is never just filler. It’s the building’s circulatory system, its shock absorber, its first line of defense against weather. Get the mortar wrong, and you’ve compromised the entire wall.
Historic masonry survives because its materials were originally designed to work together: stone or brick, lime-based mortar, and the movement, moisture, and weathering patterns that come with age. The goal of repair is not to make old masonry behave like new construction, but to choose a mortar that supports the building’s existing fabric, manages moisture correctly, and fails gently if conditions change.
Why compatibility matters
In historic walls, mortar is not just filler. It acts as the buffer between masonry units, absorbing movement, shedding water, and allowing moisture to move out of the wall. If the repair mortar is too hard, too dense, or too impermeable, the masonry units may take the damage instead of the joint.
I’ve seen this play out countless times: a Georgian brick wall repointed with cement in the 1970s, and twenty years later the bricks are spalling while the joints sit there, hard and proud and utterly unforgiving. The mortar was supposed to be the sacrificial layer. Instead, it became the bully, and the brick paid the price. This is the fundamental logic behind every conservation standard worth reading: the joint should fail before the stone or brick does. When it doesn’t, you’re looking at exponentially more expensive repairs down the line.
That is why conservation guidance consistently favors lime-based mortars for historic masonry repair, especially where the original mortar was lime-rich.[1][2][3] A compatible repair should be softer than the masonry unit, more permeable than the stone or brick, and close to the original mortar in color, texture, and appearance.[3][7][12]
What “compatible” really means
Compatibility is often misunderstood as “matching the original exactly.” I hear this from well-meaning homeowners and occasionally from contractors who should know better. In practice, it means the repair should perform in harmony with the wall — not replicate some idealized original state that may never have existed.
A compatible mortar should:
- be weaker than, or at least not harder than, the surrounding masonry[5][7]
- allow moisture vapor to pass through the joint[11][12]
- accommodate minor movement without cracking the masonry units[1][14]
- bond adequately without sealing the wall shut[7][15]
- look appropriate in joint profile, texture, and color[7][12][15]
This matters because historic buildings rarely behave like uniform systems. They are a mix of materials, phases of construction, and later repairs. Walk around the side return of a Victorian terrace and you might find original lime mortar on the front elevation, a cement patch near the damp course added in the 1960s, and something unidentifiable around the kitchen extension from the 1980s. A good mortar respects that reality instead of trying to override it. It works with the wall’s history, not against it.
Start with the wall, not the mortar bag
Before choosing a repair mortar, inspect the masonry carefully. The first question is not “What product should be used?” but “What is the wall made of, and how has it been behaving?”
I’ve watched too many people reach for a bag of pre-mixed mortar before they’ve spent ten minutes looking at the wall. That’s backwards. You need to understand what you’re dealing with before you can decide what to put into it. The wall will tell you what it needs if you know how to read it.
Look for:
- original stone or brick type
- existing mortar color and grain size
- joint profile and tooling marks
- later repairs or patching
- areas of damp, salt damage, or cracking
- previous use of cement-based pointing
Sound historic mortar should be left alone whenever possible.[8] Repointing is justified only where the mortar is decayed, cracked, or missing, not because the joints look old.[8] Minimum intervention remains a core conservation principle.[12] I’ve had clients ask me to repoint an entire elevation because the mortar “looked its age.” That mortar was doing its job perfectly. Age is not a defect — it’s evidence of survival.
Quick field check
If a joint is:
- powdery, recessed, or open to water entry
- allowing plant growth or visible washout
- separating from the masonry edges
then it may need repair.
If it is:
- hard, intact, and still shedding water reasonably
- stable despite its age
then leave it in place.
Why cement is often the wrong answer
Portland cement mortars are dense and strong. That sounds useful, but in historic masonry it is often exactly the wrong quality.
I understand the appeal. Cement sets quickly, it’s predictable, it’s available everywhere, and it feels substantial. But historic walls don’t need substantial — they need forgiving. Modern cement-based pointing can trap moisture in the wall, force salts into the masonry units, and accelerate decay of the stone or brick.[3] Instead of failing first, the mortar stays hard and transfers stress into the surrounding fabric. Over time, the masonry can spall, fracture, or erode. I’ve seen soft red bricks reduced to powder behind a cement joint that looked perfectly intact from the outside. The damage was hidden until it was catastrophic.
This is why conservation sources consistently warn against using modern hard mortars as a blanket solution for older walls.[3][7][13] The repair should be chosen for the building, not for convenience.
Common historic mortar types
Historic repair mortars are usually lime-based, but not all lime mortars behave the same way. The distinctions matter, and using the wrong type of lime can be nearly as damaging as using cement. I’ve learned to think of lime mortars as a spectrum: from the softest, most breathable air limes through to natural hydraulic limes that offer more strength without sacrificing permeability.
| Mortar type | Typical use | Main strengths | Main cautions |
|---|---|---|---|
| Air lime mortar | Soft historic masonry, sheltered conditions | High breathability, very compatible with old masonry[2][6] | Slower set, less suitable in severe exposure |
| Lime-pozzolan mortar | Historic masonry needing a modest hydraulic set | Better early strength than pure lime, still relatively breathable[1][4] | Requires careful proportioning |
| Natural hydraulic lime mortar | More exposed historic work, some stronger masonry | Faster set, improved durability in wetter conditions[1][4] | Must still be softer and more permeable than masonry |
| Ternary lime mortar | Restoration work needing tuned performance | Can balance workability, strength, and durability[1] | Needs testing, not guesswork |
| Cement-lime blend | Limited use in some compatible repairs | Improved workability over pure cement | Risky if over-hardened or poorly matched[1][5] |
In older masonry, lime/sand mortars are often more appropriate, especially where the original mortar was lime-based and exposure is moderate.[2] I’ve found this particularly true in the sheltered elevations of eighteenth and early nineteenth-century buildings, where air lime has performed beautifully for two centuries and needs nothing more than the same material put back.
How to specify a repair mortar
A good specification begins with analysis of the original mortar whenever possible.[8] If laboratory analysis is not available, a careful visual and physical assessment is the next best step.
I keep a small magnifying glass in my kit for exactly this purpose. You’d be surprised what you can learn from looking at a broken piece of old mortar under magnification: the color and shape of the sand grains, the presence of lime lumps or shell fragments, the way the binder has carbonated over time. These details are your specification. Write them down, photograph them, keep a sample if you can.
What to match
Try to match:
- binder type: lime-rich vs. cement-rich
- sand type and grading
- color and surface texture
- joint width and finish
- compressive strength and permeability[7][12][15]
A practical starting point
For many traditional lime mortars, a common starting ratio is one part lime to two or three parts sand by volume.[1][2] That does not mean every wall needs the same mix, but it gives a useful baseline for discussion with a conservator or experienced mason.
Important nuance: sand matters as much as the binder. If the sand grain size, color, or shape is wrong, the mortar may look and behave unlike the original, even if the lime ratio is sensible.[7] I’ve seen repairs where the lime was correct but the sand was too uniform and too pale — the joints stood out like a fresh scar across the face of the building. The original sand might have been dug from a local pit with all its natural variation in grain size and color. Modern washed sand from a builders’ merchant rarely replicates that.
Repointing step by step
The best mortar will fail if the work is done badly. Repointing historic masonry is as much about method as materials. I’ve watched skilled masons work joints with the concentration of a surgeon, and I’ve seen others rush through with an angle grinder and a bag of ready-mix. The difference shows within two seasons.
1. Survey the wall
Map the areas that are decayed, damp, or previously repointed. Mark them clearly. This is your working document — don’t skip it.
2. Test the existing mortar
Check hardness, appearance, and depth of deterioration. If possible, have the mortar analyzed. Even a simple acid dissolution test can tell you whether the binder is lime or cement, and that alone will guide your next decisions.
3. Remove only failed mortar
Take out deteriorated material by hand to the minimum depth needed, usually enough to reach sound mortar. Sound historic mortar should not be removed.[8][12] This is where the angle grinder does its worst damage: it cuts indiscriminately, often into the masonry units themselves, and leaves a joint that’s too wide, too uniform, and too deep.
4. Clean the joints carefully
Remove dust and loose fragments without flooding the wall with water. A soft brush and gentle air — not a pressure washer, not a hose — is usually sufficient.
5. Pre-wet if appropriate
The wall should not be dry enough to pull moisture too quickly from the new mortar, but it should not be saturated. The goal is damp, not dripping. If the wall sucks water out of the fresh mortar too fast, the lime won’t carbonate properly and you’ll end up with a weak, friable joint.
6. Place the mortar in layers
Pack the joints firmly so there are no voids. Work in thin lifts, compacting each one before adding the next. Voids are failure points — they collect water, they freeze, they expand, and the joint breaks apart.
7. Match the finish
Tool the joint to match the historic profile, texture, and compaction.[7][12] Look at the original tooling marks. Were they struck with a trowel, a pointing iron, a piece of wood? The finish isn’t decorative — it affects how water sheds from the joint.
8. Cure slowly
Lime mortar needs controlled curing. Rapid drying, frost, or driving rain can ruin the repair. Cover the work with damp hessian if the weather is warm or windy. Protect it from direct sun. If frost is forecast, stop work and wait. I’ve seen an entire season’s repointing fail because it was done in late autumn and caught by a hard freeze before the lime had carbonated.
Typical mistakes to avoid
- repointing everything instead of only failed joints
- using a mortar that is harder than the masonry
- choosing a mix based on convenience rather than compatibility
- ignoring the original sand texture and joint finish
- over-cleaning the masonry before repointing
- applying mortar too wet or too dry
- working in poor weather without protection
- covering moisture problems with pointing instead of fixing the cause
That last point deserves emphasis. If water is entering the wall from a leaking gutter, a failed flashing, or rising damp, no amount of repointing will solve the problem. You’ll just be sealing moisture in behind a fresh joint, and the damage will continue out of sight.
Signs of a poor repair
A repair may be failing if you see:
- cracking along the joint edges
- mortar debonding from the masonry
- damp patches that grow after repair
- spalling brick or stone next to hard joints
- salt deposits around the patched area
- uneven weathering that makes the patch stand out sharply
These are usually not “cosmetic” problems. They point to mismatch in strength, permeability, or detailing. When I see a patch that’s weathered differently from the surrounding wall, I know the mortar isn’t breathing at the same rate. Something is off — and the wall is showing you exactly where.
When to involve a specialist
Specialist advice is worth getting when:
- the building is listed or otherwise protected
- the masonry shows active decay or salt damage
- the original mortar is unusual
- the wall has mixed stone, brick, and later repairs
- previous cement repairs have already caused damage
- the structure is exposed to severe weather
A conservator or experienced heritage mason can help determine whether the wall needs simple repointing, localized repair, or a broader moisture-management strategy. The cost of that consultation is almost always less than the cost of fixing a bad repair. I’ve learned this the hard way, standing in front of walls that someone had “fixed” with the best intentions and the wrong materials.
Checklist for compatible mortar repairs
- confirm the masonry type and age
- identify the original mortar as far as possible
- leave sound historic mortar untouched
- choose a mortar softer than the masonry unit
- keep vapor permeability high
- match sand, color, and texture
- use minimal intervention
- repoint only failed joints
- cure the mortar properly
- monitor the repair after completion
The conservation principle behind good mortar work
The best historic masonry repair is often the least visible one. If the mortar is compatible, the wall can keep breathing, moving, and weathering in its own way. That is the real test of success: not whether the repair looks brand new, but whether it protects the building without changing how the building works.
I think about this every time I see a wall that’s been standing for two hundred years. It doesn’t need us to make it perfect. It needs us to be careful, to understand what’s already working, and to intervene with enough humility to let the building continue being what it is. Good mortar work is quiet work. If you’ve done it right, nobody will notice — and that’s exactly the point.
FAQ
Can I use modern cement for historic repointing?
Usually not. Cement mortars are often too hard and too dense for historic masonry, and they can trap moisture in the wall.[3][5][13] There are rare exceptions where a cement-lime blend might be appropriate in very specific circumstances, but these should be determined by a conservator, not assumed.
What is the safest general choice for old brick or stone?
A lime-based mortar is usually the safest starting point for historic masonry, especially when the original mortar was lime-rich.[1][2][7] The key is matching the type of lime to the exposure and the masonry — air lime for sheltered, softer work; natural hydraulic lime where more durability is needed.
How do I know if the mortar is too hard?
If the mortar is harder than the masonry unit, or if damage appears in the brick or stone rather than the joint, the mix is likely too hard.[5][7] A simple scratch test can help: if you can scratch the mortar with a fingernail but not the brick, you’re in the right range. If the mortar resists a knife blade while the brick crumbles, you have a problem.
Do all historic buildings need pure lime mortar?
No. Some exposed or structurally demanding situations may call for a more hydraulic lime-based mix, but it still needs to remain compatible with the historic fabric.[1][4] The principle doesn’t change — the mortar must be the sacrificial layer — but the specific formulation can vary.
Should all old joints be repointed?
No. Only deteriorated, open, or failing joints should be repointed. Sound historic mortar should be preserved.[8][12] This is one of the hardest things to explain to someone who wants their building to look “fresh.” That weathered joint is doing its job. Leave it alone.