How to Preserve Original Woodwork in a Historic Home
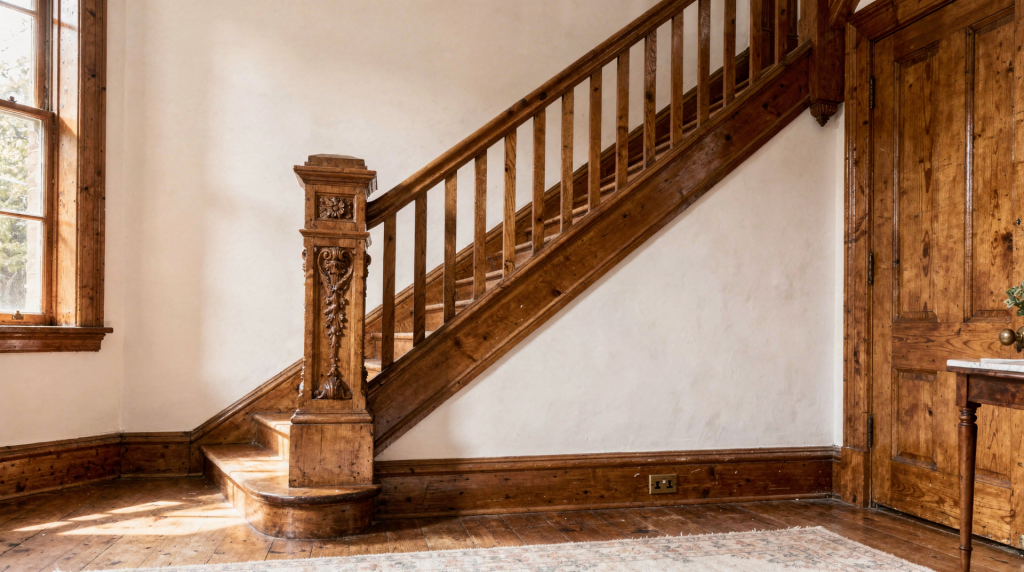
I have walked through hundreds of period houses where the original joinery told me more about the building’s history than any listing sheet ever could. A hand-planed door stile, the slightly irregular spacing of balusters, a built-in cupboard with scribed marks from the joiner — these details carry the DNA of the house. And once they are gone, replaced with machine-perfect reproductions or buried under layers of poorly applied paint stripper, that authenticity does not come back.
Original woodwork is one of the strongest character-defining features in a historic house. It gives rooms their scale, texture, and period identity. The good news is that most historic woodwork can be preserved with careful assessment, conservative repair, and the right maintenance routine. What follows draws on years of watching what works — and what fails — in real houses with real budgets and real moisture problems.
Why original woodwork matters
Historic trim, paneling, stair parts, doors, and built-ins are not just decorative. They often reveal how a house was built, altered, and lived in over time. I have seen door casings that were clearly moved during a Victorian reconfiguration, and baseboards where two different profiles meet at a seam — evidence of a Georgian room divided decades after construction. These clues are part of the building’s biography.
In preservation practice, the guiding principle is simple: retain as much original material as possible, repair what is damaged, and replace only what cannot reliably perform. That approach protects both the historical value and the practical integrity of the house. Sound woodwork can often last for generations if moisture, finishes, and repairs are managed correctly. I have inspected eighteenth-century floorboards still doing their job because someone kept the underfloor ventilation working and resisted the urge to sand them flat every decade.
What counts as original woodwork
In a historic home, “woodwork” usually includes:
- Baseboards
- Crown molding and picture rails
- Door and window casings
- Paneled walls and wainscoting
- Stair balusters, handrails, and newel posts
- Mantels
- Built-in shelving and cabinetry
- Pocket doors and transoms
- Exterior trim and porch details
Not all of these need the same treatment. A mantel in a dry interior room may only need cleaning and finish care, while exterior trim exposed to rain needs active moisture management and more frequent inspection. I learned early in my career that a porch column base rotting at ground level is almost never just a wood problem — it is a drainage problem that happens to show up in wood.
First rule: diagnose before you touch anything
The biggest mistake homeowners make is rushing to sand, strip, or replace wood before understanding what is actually wrong. I have watched contractors attack a stained window casing with a heat gun, only to discover the stain came from a leaking pipe two floors above. Start with a condition survey of the whole assembly, not just the visible damage.
Look for:
- Peeling paint
- Soft or punky spots
- Gaps at joints
- Split moldings
- Water staining
- Signs of movement or sagging
- Darkened areas near leaks or plumbing runs
- Paint failure around windows and exterior trim
A local patch may be enough if the damage is small. If the problem keeps returning, the cause is usually elsewhere: roof leaks, failing flashing, condensation, poor drainage, or trapped moisture behind the woodwork. I once traced recurring rot in a dining room baseboard to a downspout that discharged directly against the foundation wall three feet away. Fixing the downspout cost a fraction of what repeated trim repairs had cost over the years.
The preservation hierarchy: save, repair, replace
Use this order of decision-making. It keeps you honest and prevents the kind of over-restoration that erases a building’s texture.
| Condition | Best response | What it means in practice |
|---|---|---|
| Sound, intact wood | Preserve | Clean carefully, maintain finish, monitor |
| Minor splits, chips, or localized decay | Repair | Consolidate, patch, Dutchman repair, fill voids |
| Extensive loss or structural failure | Replace selectively | Reproduce the profile, dimensions, and joinery |
| Repeated failure from hidden moisture | Fix the cause first | Repair the building assembly before the trim |
This “least intervention” approach is the safest way to preserve the original fabric of a historic home. It also tends to be the most economical over time, because you are solving problems rather than chasing symptoms.
How to clean historic woodwork safely
Cleaning should remove dirt and grime without destroying the surface or dulling historic finishes. I have seen well-meaning owners scrub shellacked paneling with household cleaners and strip away a century-old patina in an afternoon.
Good options
- Dry dusting with a soft brush or microfiber cloth
- Slightly damp wiping on sound finished wood
- Gentle cleaning with a mild, finish-appropriate cleaner
- Vacuuming carved or paneled surfaces with a brush attachment
Avoid
- Aggressive scrubbing
- Saturating wood with water
- Abrasive pads
- Unknown all-purpose cleaners on delicate finishes
If the wood has an old varnish, shellac, or painted finish, test a small hidden area first. Historic surfaces are often softer and more fragile than modern trim, especially after years of sun exposure and repeated repainting. A test patch behind a door or inside a closet can save you from a costly mistake.
Paint removal: when to do it, and when not to
Paint removal is one of the most misunderstood parts of woodwork preservation. I have met owners who assumed every piece of painted trim was hiding beautiful timber underneath, when in fact the wood was always meant to be painted — often a secondary species like pine or poplar that was never intended for clear finish. If the existing paint layer is sound, there may be no reason to strip it at all.
Remove paint only when:
- The finish is failing and unsound
- You need to reveal a historic natural finish
- Repairs require access to bare wood
- Excessive paint buildup has obscured detail
Use gentle methods. Historical guidance discourages dry scraping and power sanding on interior historic woodwork because these methods can damage profiles and surface fibers. Wet hand scraping, careful softening of old paint, and hand sanding are safer for delicate work. I have watched a skilled conservator remove seven layers of paint from a Georgian door architrave using nothing more aggressive than a dental pick and patience — the molded detail emerged crisp and intact.
Important caution
If you suspect old lead paint, stop and follow safe lead-paint practices. Historic houses often contain multiple layers of old coatings, and disturbing them without precautions creates health risks. This is not a corner to cut.
Repair methods that preserve original material
1. Consolidation
If the wood is weathered but still mostly intact, a consolidant can stabilize weakened fibers before further repair. This works best when decay is limited and the remaining wood still has strength. I have used this approach on window sills where the surface had softened but the structural core was sound.
2. Dutchman repairs
A Dutchman repair replaces only the damaged section with a carefully fitted piece of matching wood. It is ideal for corners, molding ends, sill edges, and localized decay. When done well, the repair should be visible on close inspection but not distracting — a record of care rather than a disguise.
3. Epoxy repair
Epoxy can be useful for voids, cracks, and small losses when the surrounding wood is still sound. It should be used as a repair material, not a shortcut to ignore ongoing moisture problems. I have seen epoxy repairs fail within two years because the leak that caused the original rot was never addressed.
4. Patch-and-splice work
For longer damaged lengths, splice in new wood rather than replacing the whole run. Match grain direction, thickness, profile, and reveal so the repair blends visually and structurally. A well-executed splice in a baseboard run can be nearly invisible, while a full replacement of the same run would introduce new wood with different movement characteristics and a profile that never quite matches.
When replacement is justified
Replacement should be the last resort, but it is sometimes necessary. It makes sense when:
- Decay is widespread
- The piece has lost structural function
- The wood is so damaged that repair would be unstable
- Hidden deterioration has damaged nearby framing
- Repeated patching would create a weaker result than a well-made replacement
If you must replace original woodwork, copy the original exactly in size, shape, profile, joinery, and surface detail. A “close enough” profile often looks wrong in historic interiors, especially next to surviving original pieces. I have walked into rooms where one replaced door casing stood out immediately — the shadow lines were different, the quirk was too sharp, the proportions slightly off. The eye registers these discrepancies even when the mind cannot name them.
Matching historic profiles and details
Before removing anything, document the existing work. I keep a folder of cardboard profile tracings from houses I have worked on, and they have saved me more than once when a millwork shop claimed a stock profile was “the same.”
Best documentation steps
- Take straight-on photos in good light
- Measure width, depth, and projection
- Trace molding profiles on cardboard or stiff paper
- Note miters, joints, and fastener locations
- Save fragments if pieces break during removal
If the house has multiple similar rooms, compare details carefully. Historic homes often contain variations from different building phases, and those differences are part of the building’s story. A slightly different baseboard profile in the rear wing might tell you that section was added a generation later — that is information worth preserving, not erasing.
Finish systems: keep them compatible
A finish is not just cosmetic. It protects wood from moisture and ultraviolet light, and the wrong product can trap problems instead of solving them. I have seen modern polyurethane applied over old shellac, only to peel within a season because the two systems could not bond.
General guidance
- Use finishes compatible with the existing surface
- Keep natural finishes natural where that is historically correct
- Repaint only when paint is the original or most appropriate finish
- Avoid heavy, glossy coatings that obscure detail
- Maintain painted exterior woodwork on a regular cycle
If you are restoring a natural-finish interior, test carefully before stripping. Some old woodwork was originally stained, shellacked, or varnished, and a full paint removal can reveal a finish history worth preserving. I once worked on a house where stripping a painted mantel revealed an original grained finish underneath — a deliberate decorative treatment that mimicked more expensive timber. We documented it and left it intact.
Moisture is the real enemy
Most wood failure in historic homes starts with water. The wood itself may be old and stable, but repeated moisture exposure destroys finishes, feeds decay, and opens joints. I have learned to look up, down, and outside before I look at the damaged wood itself.
Watch these common moisture sources
- Leaking roofs
- Failed gutters and downspouts
- Poor grading near exterior walls
- Condensation at windows
- Plumbing leaks inside walls
- High indoor humidity
- Missing or damaged flashing
- Splashback at exterior trim
If woodwork keeps failing in the same place, repair the water source first. Otherwise the same damage will return no matter how carefully the trim is restored. This sounds obvious, but I have seen the same window sill replaced three times in a decade because no one addressed the missing drip cap above it.
Exterior vs. interior woodwork
| Interior woodwork | Exterior woodwork |
|---|---|
| Protected from weather | Exposed to rain, sun, and freeze-thaw cycles |
| More likely to suffer finish wear and impact damage | More likely to suffer decay and joint failure |
| Can often be cleaned and repaired conservatively | Needs stronger moisture management and paint maintenance |
| Natural finishes are more common | Paint usually provides essential protection |
Exterior woodwork needs regular inspection for failed caulk, open joints, and peeling coatings. Interior woodwork usually fails more slowly, but it still suffers from humidity swings, cleaning damage, and over-restoration. The threshold between interior and exterior — window and door surrounds — is often where problems concentrate, because these areas experience both environments.
A practical maintenance routine
Every season
- Check for leaks and water stains
- Inspect painted trim for lifting edges
- Look for movement in stair parts and built-ins
- Clean dust and grime from horizontal surfaces
Every year
- Review window and door casings for cracked joints
- Touch up failing paint before bare wood is exposed
- Confirm gutters, flashing, and drainage are working
- Check basements, attics, and rooflines for water intrusion
Every few years
- Assess whether coatings need renewal
- Reevaluate repairs that may be opening again
- Compare photographs to spot subtle movement or deterioration
A small annual maintenance routine is far cheaper and less invasive than a major restoration later. I have kept a simple maintenance log for my own house for years — a notebook with dates, observations, and photos — and it has caught problems when they were still small enough to fix in an afternoon.
Common mistakes to avoid
- Stripping woodwork just because it looks dark
- Replacing original pieces that could have been repaired
- Using power sanders on delicate moldings
- Filling every gap with hard modern products
- Ignoring the moisture source behind the damage
- Painting over active decay
- Mixing incompatible repair materials
- Copying the wood species but not the original profile
The biggest preservation mistake is treating woodwork as a surface finish rather than part of a building system. A successful repair considers the trim, the wall, the opening, and the conditions around it. Woodwork does not exist in isolation — it is connected to plaster, masonry, framing, and the exterior envelope, and all of those relationships matter.
Step-by-step: how to approach a damaged section
- Document the existing piece with photos and measurements.
- Determine whether the damage is cosmetic, localized, or structural.
- Check for nearby moisture problems.
- Clean the surface gently and reassess.
- Stabilize soft areas if the wood is still salvageable.
- Patch or splice only the damaged portion.
- Match profile, grain direction, and finish as closely as possible.
- Seal and repaint or refinish with a compatible system.
- Monitor the area over the next season for movement or recurring damage.
This sequence may seem methodical, but it prevents the kind of rushed repair that looks fine for six months and then fails. I have learned to treat step nine — monitoring — as essential, not optional. Buildings move with the seasons, and a repair that holds through a dry summer may open up during a wet winter.
Quick checklist before you hire a craftsperson
- Have you identified the cause of the damage?
- Can the original piece be repaired instead of replaced?
- Will the repair match the existing profile exactly?
- What finish system will be used?
- How will the repair be protected from future moisture?
- Can the contractor provide examples of historic trim work?
- Will any removed original material be saved?
That last question matters more than many people realize. I always ask contractors to set aside removed fragments — a section of original baseboard, a piece of molding, an old shutter part. These fragments can serve as reference samples for future repairs, and they preserve a physical record of the house’s construction that no photograph can fully capture.
FAQ
Can damaged historic woodwork always be saved?
No. If decay is widespread or the wood has lost structural integrity, selective replacement may be the safer option. The goal is to retain as much original material as possible while keeping the house sound. I have made the call to replace when the alternative was a patchwork that would fail within years.
Should I strip paint from all original trim?
No. Strip only when there is a good reason, such as failed coatings or the need to reveal a historically important finish. In many cases, repainting over a sound layer is the better choice. Some of the best-preserved historic interiors I have seen still wear their original paint, refreshed carefully over decades.
What is the best filler for old woodwork?
Use a repair material that suits the condition of the wood. Small voids may be filled with epoxy or a wood-compatible filler, but the area must be stable and dry first. No filler will compensate for ongoing moisture or structural movement.
How do I know if a piece needs replacement?
If the wood is extensively decayed, structurally unstable, or no longer performing its job, replacement may be justified. Even then, the new piece should match the original in profile and detail. When in doubt, get a second opinion from someone who works regularly with historic fabric.
Is original woodwork worth the cost to restore?
Usually yes. Original trim, doors, stairs, and built-ins are major contributors to a house’s historic value and visual coherence. Repairing them usually preserves more character than replacing them. I have never met an owner who regretted saving original woodwork, but I have met many who regretted losing it.
Conclusion
Preserving original woodwork in a historic home comes down to three things: understand the cause of damage, repair as little as possible, and keep moisture under control. When you work from that order, you protect both the craftsmanship you can see and the building logic underneath it.
A well-preserved piece of historic woodwork should still look like it belongs to the house, because it does. That continuity — the sense that the same hands that shaped the wood a century or two ago are still present in the room — is what makes a historic interior feel authentic, livable, and worth keeping.